01 09 10

Thursday 28 February 2019

(Almost) spring on the allotment

I'd be enjoying this run of warm, sunny weather much more if it was, say, early May than February, but it's certainly been nice to get down to the allotment more than usual at this time of year. While it's a bit unsettling to get sunburned in the north of England in what is technically still winter, we've at least managed to get a head start on our spring jobs.

We've had quite a hectic social calendar over the last few weekends but have spent a few hours each week at the plot whenever possible. Last weekend, our progress included:

  • Digging over and covering four beds
  • Cutting back several smaller fruit trees
  • Digging up a very old redcurrant bush
  • Extending our woodchip and paving stone path
  • Marking out new beds

But perhaps the thing I'm most excited about is the fact that we finally tackled The Mound. When we took on our plot, the ground was incredibly uneven. We've made good progress at levelling it out over the past year, but a huge mound near the entrance remained untouched. Well, we finally decided to tackle The Mound last weekend. It's hard to see in photos how big it was, but I estimate it at around 4 feet high, 5 feet wide and 12 feet long. The Mound was covered in about 6 layers of plastic and weed membrane, some of which had started to disintegrate. It probably took longer to remove these layers than to do anything else as there were so many plants and roots growing through the various layers, some many feet long.

Before we started tackling The Mound...
...and after!

Once we had removed the bulk of the coverings, we started digging. What we found was a mixture of soil, bricks, rubbish, large shards of glass and lots and lots of stones. It took several hours to get there, but the area is almost levelled out now, which we are delighted about! Now just the several visits to the tip to get rid of all the rubbish and broken glass!

The bricks we found will be put into use elsewhere on the plot, while the soil was used to fill in some of the other uneven patches of ground.

Love a productive Saturday

This weekend's plans include digging over more beds, trying to get hold of a ladder to prune the huge cherry tree, burning as much waste as possible and building some more raised beds. Let's hope it's a dry one! In other news, I planted some crocus bulbs before winter and had completely forgotten about them so was pleasantly surprised when they started appearing recently. So nice to have some colour at this time of year!

Crocuses adding some colour


Wednesday 3 October 2018

Everton Community Garden

We were lucky enough to spend some time at the fantastic Everton Community Garden at the weekend, a place I'd never heard of previously but fell in love with immediately! My family was having a bit of a family reunion and as one of my relatives is heavily involved in the running of the garden, she suggested we have it there. My great-grandparents were the common link for this branch of the family, and they originally settled in Everton from Wales and Ireland. It was extra special meeting relatives I've never met before in the exact place our ancestors lived!


Arriving at Everton Community Garden


My relative gave us a tour of the garden and explained that it's run by volunteers for the local community. Like many other community gardens, Everton Community Garden has lots of produce, which it gives away to locals in return for donations to help with the garden's running costs. Everything is organic and the entire enterprise is run on a shoestring budget, but the volunteers have done an amazing job with the site.


The vast majority of the beds are raised, making them accessible to a wide range of users. There's an SEN school alongside the garden, and the pupils often visit the site. The site is paved, making it accessible to wheelchair users, and there is plenty of space between beds. 


There are two large polytunnels on the site, and these made me determined that we need a greenhouse or small polytunnel on allotment 22 as soon as possible! I really want the extra flexibility and possibilities you get with greenhouse growing, added to which, such structures make a great shelter from the biting cold wind in winter!

Everton Community Garden polytunnel

We visited right at the end of September, obviously at the end of the growing season for most crops, but there was still a huge amount of activity in the outdoor beds and in the vast polytunnels. There were bountiful raspberry bushes and strawberry plants (still!), lots of squash, piles of courgettes and mountains of tomatoes and peppers to name just a few. I was also impressed by the delicious grapes growing both inside one of the polytunnels and along the outdoor archway. I had no idea British-grown grapes could taste so good!

Grapes growing in the polytunnel

I picked up a few tips from some of my gardening relatives, including some companion planting ideas, and am keen to put their suggestions into practice. I'm also definitely going to be looking to grow yellow raspberries on allotment 22 next year after sampling just how tasty they are. I'm also going to be branching out into as many different types of squash as I can as the varieties you can buy in the shops are so limited. 

We came home with a huge bag of fruit and veg, an added bonus to what was already a lovely day. I think the courgettes, peppers and tomatoes we brought back with us will most likely end up in some kind of roasted Mediterranean veg pasta, perfect for brightening up the chilly start to October we're having.

Homegrown tomatoes of all sizes


If you're in the Merseyside area, I highly recommend you pay a visit to this lovely garden. If nothing else, you'll be able to pick up some amazing organic produce for the cost of a donation to the organisation! The garden was so much better than I expected and it's made me want to get involved with a similar project closer to home so I'm currently researching other community gardens in the area. If you're interested in setting up something similar, the RHS has a great resource section on community gardens and how to go about starting one. The Know How Non Profit site also has some good beginner info, and provides links to lots of useful sites that should help you. 

Jenny  x

Wednesday 26 September 2018

The best allotment books for beginners

I LOVE allotment and gardening books, even those that aren't particularly helpful or well-written. I find them incredibly relaxing to read, and can often be found flicking through them at the end of a long, tiring, stressful day.

I have a pretty sizable collection already, despite only starting to take an interest in gardening and growing in the past year. These are just a few of the books I own, but there are many more scattered about the house:


With the internet being such a valuable source of gardening and growing information, I originally thought I wouldn't find books that helpful. However, as a complete beginner, I found it useful to have a few reliable sources to refer to, rather than wading through the often confusing and conflicting information online.

Some of the books I own are reliable favourites I return to again and again. Others...less so. I bought several books very cheaply via eBay and some of them are poor to say the least. Patronising, not particularly helpful, and surprisingly sexist in some cases, despite being published fairly recently. This post will concentrate on the books I've found most helpful, however.

In no particular order, these are the books I would recommend to a novice allotmenteer or someone looking to start growing fruit or veg at home for the first time:

Allotment Month by Month: How to Grow Your Own Fruit and Veg
Alan Buckingham


Allotment Month by Month was the first book I bought when we took on our plot, and it was incredibly helpful.  It's very clearly and attractively laid out and I love that it's separated into months so you can see at a glance what you should be doing at any given time! Due to the sheer volume of topics it covers, it doesn't go into a great deal of depth, but as an overview for newbie growers, I think it's one of the best books out there.

It has an extensive section on many of the most commonly grown allotment crops, with some useful tips on sowing, growing and harvesting. The book is laid out similarly to a very helpful textbook, and feature attractive photos to boot. If you only buy one book, make it this one!

RHS Allotment Handbook & Planner: What to do when to get the most from your plot
The Royal Horticultural Society


The second book I purchased after signing up for my plot, the RHS Allotment Handbook & Planner is another one I found extremely useful. The advice is pretty thorough and the book has a similar textbook feel to Allotment Month by Month. As you might expect from the RHS, it's a well put together book with some stunning photos. There are sections on just about anything you can think of when it comes to allotments, including keeping chickens and which insects are particularly beneficial to your plot.

I tend to use this book as an introduction to various techniques and then head over to the RHS website if I need more in-depth info. There is a fantastic grow your own section, and I can get lost on this website for hours if I'm not careful!

The Veg Grower's Almanac: Month by Month Planning and Planting
Martyn Cox


I received this as a gift for Christmas and I didn't think I'd get much use out of it as I already had a few other books by then. However, The Veg Grower's Almanac is a fascinating little book. Perfect for reading in bed (or while taking a break down on the plot at allotment 22!) due to its more compact size in relation to most of my other allotment books, it's a goldmine of info. It takes a different approach to the other two books above, and contains interesting nuggets of information you wouldn't usually find in a a gardening book. There are sections on the history of various plants, tips on growing more unusual crops and some genuinely entertaining facts on all things fruit and veg.

I didn't actually realise this was a Gardener's World publication until I picked it up just now to flick through it, but it's slightly more informal and conversational style makes sense now I know this.

Practical Allotments
Paul Wagland


I picked up Practical Allotments at a local garden centre not long after we'd taken on our plot. At that point, I was so hungry for tips and advice, I was pretty much snapping up everything with the word "allotment" on it. This turned out to be a pretty useful purchase, however. Not so much for growing advice - although there is some of that in here - but more in terms of inspiration for laying out and managing the plot. While there are things I am simply never even going to contemplate - such as installing solar panels on my shed - there are some handy tips for adding a seating area, building your own compost bin, saving seeds and lots of other practical things.

I'd say this book is particularly suited to anyone who's inherited a particularly crap plot, that is, one with no usable structures or one that needs a complete overhaul to make it work efficiently. If you have been lucky enough to land a well-maintained plot with shed, greenhouse, immaculate fencing and pristine beds, this probably won't be quite as useful!

So there are my favourite books out of the 20 or so I've accumulated in the past year. That isn't to say the others aren't useful or I don't enjoy reading them, just that those listed above are the ones I return to most frequently and the ones I've found most consistently helpful.

Please let me know if you've read any allotment or gardening books you loved, or if you've read any of those mentioned above!

Jenny x


Tuesday 4 September 2018

Cheap, simple allotment paths

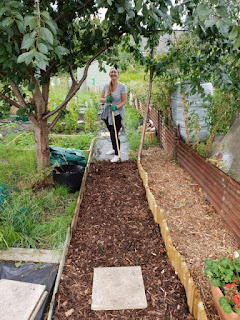
We finally got round to starting to lay some paths last week, and it makes arriving at the plot so much more pleasant! After much uhming and aahing, we decided to go for wood/bark chip paths on the allotment. We have such a terrible problem with marestail that we needed paths that consisted of several layers to try and stop anything getting through. Our heavy-duty weed membrane has proven to be no match for the ever-tough marestail, and the nasty green spears were popping up all over the covered parts of our plot all summer and spring.

We certainly didn't want to spend too much cash putting down allotment paths, so tried to keep it cheap and simple. The photos below show the beginnings of the main path down the side of the plot last week. We've done a fair bit more since these pictures but forgot to take photos at the weekend. 

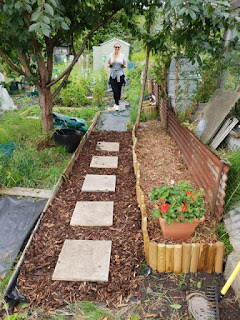
First, we cleared as many of the weeds as possible. Some parts of the plot have been covered with thick weed membrane since last summer, and we've been pulling up the marestail as it pokes through wherever possible, so some of the path areas weren't too bad. Next, we laid down a couple of layers of thick cardboard, hoping this would provide another barrier against the weeds. It will also rot down over time into the soil. On top of the cardboard we added heavy-duty weed membrane, which we pegged down on either side at intervals of about one metre. Next, we heaped on mounds of wood chippings and bark chippings. We got a lot of chippings free as the council had recently delivered a truckload to the allotment. We also bought some very cheap chippings from Asda, Home Bargains and Wilko, and will continue to snap up any we see on offer in the end of season sales! We'll obviously need a huge amount to cover all our planned allotment paths, but we're not in any huge rush so will continue to grab the free council chippings whenever they're delivered.

New allotment path with weed membrane down

Finally, we have started laying paving slabs on top of the chippings. We've got a fair few slabs scattered around the plot and thought we'd try them out for this purpose. 

spreading woodchippings on allotment path


We've had very limited time down at the plot this summer as we both work full-time and this year has been horribly stressful due to family illnesses, bereavements and a number of other things that have taken up all our weekends and energy. It's so nice to see small signs of progress on the allotment though, and we're excited to get some more paths finished over the autumn!

woodchipping and pacing stone allotment path

I'm looking forward to seeing how the paths fare against the marestail next spring - fingers crossed it can keep the stuff under control!

Thursday 5 July 2018

Dismantling the broken greenhouse...after we find it

When we took on our allotment 22, there was a smashed greenhouse at one end, near the entrance. We made a brief attempt to clear it last year but we had so many other tasks to do that this one kind of fell by the wayside. We finally set aside a whole day to work on this area last week and managed to not only dismantle the metal frame and clear up lots of smashed glass, but also unearth a pretty sturdy looking brick base.

The marestail (OBVIOUSLY) had taken over the whole area, along with long grasses, brambles and bindweed. For want of a more refined technique, we simply hacked away at the weeds with a pair of garden shears. This at least allowed us to see bits of the greenhouse frame poking out from the greenery. We worked section by section, trying to take apart the frame as we came across new parts. The metal was pretty twisted in places and a lot of the bolts and screws were no longer usable so we ended up pulling most of it apart rather than using any tools.

removing a broken greenhouse from allotment
There's a greenhouse under there somewhere...

It took most of the day to clear the greenhouse and part of the surrounding area but it's made a huge difference. Now when you're working on the plot, you can look up and see other plots and people walking by rather than just a 5-foot high wall of marestail!

Partway through
Unearthing parts of the greenhouse frame...

...and lots of old gloves, trays and rusty tools


We have a greenhouse base!

We've managed to get up most of the glass and that will be heading to the tip. As for the frame, we're going to keep hold of that until there's another scrap metal collection on the site. 

This weekend will involve clearing more of the land around allotment 22 and possibly even laying our first section of path! We're planning on using heavy duty weed membrane with woodchip on top. Handily, the council have just dumped a pile of woodchip inside the site entrance so we're hoping there's still lots there tomorrow. The problem with working full-time when half of the other plotholders are retired is that they're there every day in the week so we miss out on things like free woodchip as it's all gone by the time we get there!


Tuesday 5 June 2018

A lengthy hiatus and a lot of progress

We're well and truly back and getting stuck into the allotment after a lengthy break. Due to serious illness in the family, work commitments and a particularly stressful few months, we didn't get down to the allotment for several months over autumn and winter. We're trying to make up for it now, however, and have been pretty productive over the last couple of months.

Of course, the ******* mare's tail/horse tail/whatever you prefer to call it has been super active once more and it's been really disheartening to see it taking over the plot again after all our hard work of last year! We understand we just won't be able to eradicate it though so are just doing our best to keep it under control. Even the most pristine plots on our site - those with dedicated and retired tenants who spend hours on-site every day of the week - still have the odd mare's tail scattered around the crops so we've accepted we just need to get on with it. I still hate it though!

We have strawberries this year, although our biggest and best strawberry was eaten by a bird this week before we had a chance to net the plants. The nets are in situ now, however, and the rest of the plants look good. 

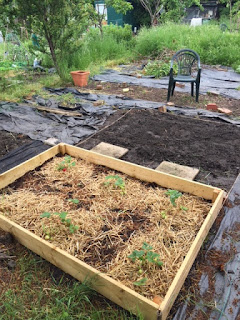
We've dug over three beds so far, and have built wooden edging for the first one.


We decided against proper raised beds as we were concerned they'd have a tendency to dry out and with us both working full-time, it's not always possible for us to get to the plot as much as we'd like. Our beds are ever so slightly raised, but that's just the result of the extra material we've mixed in with the existing earth - rotted manure and compost to try and improve the soil. We chose to edge the beds with wood as it gives us the flexibility to raise the beds in future if we want to and also keeps everything neat. We are planning on using free woodchip for our paths so the wooden edging will act as a barrier to keep things in place. 


We've also got a lovely bed of tomato plants on the go. A kind allotment neighbour gave us a tray of Gardener's Delight plants and we planted them out at the weekend after hardening them off outside. Unfortunately, the hardening-off period coincided with the weekend we were away in London and it was scorching hot for several days, so the poor plants looked a little worse for wear. A bit of TLC seems to have perked them up though and they're looking much better now. Neither of us has ever grown tomatoes before so we're looking forward to learning as we go and hopefully having a glut of delicious cherry toms later this summer.

Plans for this weekend include sowing some curly kale (I LOVE kale and have heard it's hardy and easy to grow so fingers crossed!) and finally starting work on a seating area so we've got somewhere comfortable sit on those long days down on the plot :-)

Finally, it's not our plot (obviously) but I am in constant awe of this super-neat and well-maintained plot behind ours...


Tuesday 1 August 2017

Building a Shed Base on an Allotment

Building Our Allotment Shed Base

When we took on our plot, it was incredibly overgrown (still is), with the worst offenders being brambles, mare's tail, bindweed and couch grass. The area in which we wanted to place our shed was originally completely overtaken by brambles, reaching around 12-feet high in places. We decided we'd keep an area of brambles against the back fence of the allotment, and bring the shed forward a little from where we would have ideally placed it.

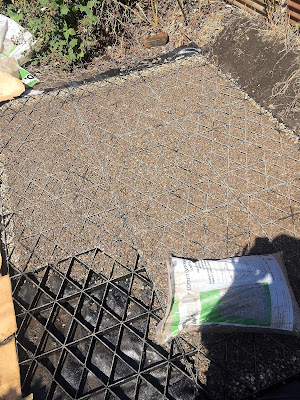
We looked at various options for the shed base and decided for budget, time and lack-of-DIY-skills reasons to go for a plastic shed base. These are really convenient as they can be placed on grass or bare ground. We bought our 8 x 6 shed base off eBay for around £70, including delivery. It was supplied with a heavy-duty weed membrane to be used underneath the plastic grid base.

Preparing the ground for our shed base


To prepare the ground where we wanted the shed, we had to cut back a lot of very tall and very dense brambles, as well as remove what seemed like miles of bindweed and a lot of 6-feet tall mare's tail! We cut everything back as much as we could, then dug up all the bramble roots (hard work!).

Post cutting back, pre-digging!

 We then set about digging over the ground, partly to bury any of the less troublesome weeds a couple of feet under the ground, and also to help with levelling out the very uneven and bumpy ground. There was a difference in up to a foot between the ground level in places! The ground was also extremely rocky, with lots of broken glass and pottery, so we pulled out anything we found as we dug. 

After some heavy-duty digging and clearing

When we'd got the ground fairly level, we took our plastic shed base sections and laid them on the ground with a spirit level to see how level the ground really was. Pretty level, thankfully! We smoothed out any noticeably uneven sections, then set about laying out the heavy-duty weed membrane supplied with our shed base. We've been using heavy-duty membrane to cover the areas of the plot we've been clearing in order to weaken the mare's tail etc. before we get round to cultivating the land, but this stuff was something else! While nothing has come through the membrane we've been using, the sheet supplied with the base is a fair bit thicker so I'd consider trying to find this to purchase if I needed permanent ground cover anywhere on the plot in future.

Assembling the shed base


Unpacking the plastic shed base

Once the membrane was in place, we set out the shed base sections. Next came the only frustrating part of the process - attaching the clips! The base was supplied with lots of little plastic clips that fasten each section to the adjacent section, and also anchor the base to the ground. Attaching the clips to the grid sections was OK, but making pilot holes in the membrane through which to stick the anchoring part of the clip was not. The only way to do this was the make holes around the clips - I'm sure jabbing the weed fabric with a pair of scissors while cursing the manufacturers is not how most people do this, but we couldn't think of another way. 

Laying a plastic shed base on weed membrane
Laying out the plastic shed base

We also got caught in a huge thunder/rain/hail storm halfway through laying the base, so I was effectively stabbing into the wet mud with a pair of scissors. Not enjoyable.

Eventually, we managed to get the base laid out and had all the clips anchored through the membrane and into the (by now sodden) ground. We left it all to dry out a little overnight and returned the next morning.

Filling the base with gravel


How to fill a shed base with gravel
Filling the plastic shed base with gravel

Far more satisfying than constructing the base was the emptying of 12 sacks of gravel into the plastic grids and smoothing it out with our feet. I'm not sure why, but this was quite enjoyable and we really got a feel for how solid and strong the base would be once it was finished. We used B & Q 10mm gravel. I'd totally recommend it. It is actually quite attractive, very reasonably priced and would make a good path covering too so we might actually buy some more for this purpose. It's currently £3.18 for a sack, or £2.20 when you buy 10 or more, which we did. 

B&Q 10mm gravel


Finally, we had our sturdy, level base!

Plastic shed base filled with gravel on allotment
Completed allotment shed base
All in all, we're really happy with our allotment shed base. I'd definitely use this method again in future if budget/time was an issue, but would probably do away with the clips supplied with the base and explore other options. While we did manage to get them into the ground, this was a complete pain to do and I'm sure there is a far better method than the one we used!


Tuesday 25 July 2017

We've Got an Allotment Shed!

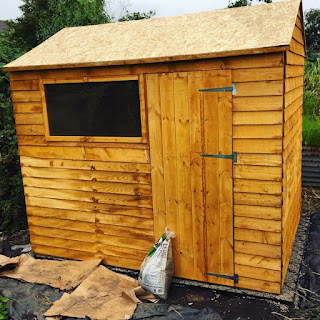
It's not finished, but it's standing and it's got a roof so we've at least got somewhere to leave our tools now!

Building a shed on an allotment
Allotment shed joy

Needless to say, we knew nothing about building a shed on an allotment, so I did a bit of research about where to start, and about what kind of base would be most practical. I ordered a plastic base off Amazon, and we filled it with 12 large bags of 10mm gravel from B and Q. I'll be adding a blog post with more details shortly as this was a very easy and convenient method which I'd completely recommend!

We knew roughly where we wanted to locate the shed and had spent a couple of days clearing brambles from the relevant area. We didn't bank on torrential rain for the several days leading up to the delivery though, or being caught in a massive thunderstorm partway through laying out the base! We got pretty muddy, quite scratched and very, very tired, but we managed to lay the base for the allotment 22 shed on Saturday, then started the actual construction on Sunday.

We spent around 8 hours at the plot on Saturday (including 30 minutes sheltering in the car after realising hiding under a lofty cherry tree in a massive thunderstorm probably wasn't the best idea), and about the same again on Sunday.

When the heavens open when you're JUST about to
finish laying the shed base after 8 hours...

This week's jobs - weather permitting - are to felt the roof, add the trim, screw the shed onto its base, and to give the whole thing a coat or two of paint. Then all that will remain is to add some shed storage and creature comforts...


Monday 17 July 2017

Tackling the Brambles: Part Two

We've been pretty busy lately and haven't had as much time at the allotment as we would have liked. The arduous task of removing brambles had been left for the last couple of weeks as we've only really been down to collect redcurrants and check on the fruit bushes. Yesterday, however, we had a good 5 hours down there and made considerable progress with clearing the space where our shed's going to go.


After Googling how to get rid of brambles and reading up on other people's experiences, we just opted for the simple method of cutting them back manually then digging the roots out. We don't have strimmer so just cut them back with secateurs then dug into the ground with a fork to loosen the soil until we could start pulling the roots out. God, those bramble roots spread far! It was an eyeopener to follow them along under the surface and see just how far they went.

We've now cut back as far as we plan to so once we've removed the rest of the bramble roots, it will (hopefully) just be a case of keeping the brambles cut back to the area they currently occupy and taking care not to let them start taking over the bottom third of the plot again. If we were planning on removing ALL the brambles, I think we'd have to give in and borrow a strimmer from someone, and we'd likely need a lofty stepladder too as the brambles are so high. We're going to leave the brambles right at the end of the plot though as that patch doesn't get a great deal of sun and there are lots of frogs living down there. I like the idea of leaving one little part of the plot as natural as possible and I love blackberries so am happy to leave one section of brambles!

We had originally decided to leave the bulk of the brambles until after we'd collected all the blackberries in a couple of months' time, but yesterday, we just got on a roll and kept hacking and hacking! The section we removed was absolutely swamped in bindweed, and there was also a lot of dead wood mixed in with the brambles. We must have cleared about 15 square metres of brambles and bindweed. We need to go back this week and finish digging up the roots but we got some seriously heavy duty roots out yesterday - so satisfying! Equally satisfying is removing bindweed - metres and metres of it - in one movement! That stuff is relentless yet weirdly satisfying to pull off other plants and bushes. Of course, the omnipresent mare's tail was also shooting up alongside/inside/all around the brambles so we pulled up a lot more of that too, some of it 5 or 6 feet tall. I hate that stuff!

Overgrown allotment with brambles, bindweed and mare's tail
Before...

Clearing brambles from allotment
After...

Before the sunburn :-(


I also got a bit sunburnt, which I'm really annoyed about as I'm usually so careful. It was blazing sunshine later in the day but distinctly overcast for half the time we were there and it just slipped my mind to SPF up. I'm starting to understand why all the allotment holders have such a healthy glow all year round.

We're hoping to get down to the plot a few evenings this week - weather permitting - and get rid of the rest of the bramble roots, as well as level out the ground ready for the shed base.

All being well, we're aiming to get our shed delivered on Saturday and spend the weekend constructing it. So exciting to think we won't have to cart our tools back and forth every time any more! It will make it so much easier to pop down to the allotment; plus the car will no longer need valeting every 5 minutes. I think having the shed will make the plot finally really feel like "ours" and I can't wait to turn it into a little haven where we can sit and have a break from all the hard work and get out of the sun/rain as needed.

Thursday 13 July 2017

Redcurrant Gin Recipe

Easy redcurrant gin recipe


I love gin. It's the only spirit I actually drink, and I love how versatile it is. My favourite way to drink it at the moment is with elderflower tonic (which I've only just discovered!), a few slices of cucumber and a couple of fresh mint leaves. Hopefully I'll be growing cucumber and mint on the allotment by next year, and I'd quite like an elderberry bush eventually too, but for the moment, all we've got is lots of berries in various stages of ripeness and attractiveness.

I'm holding out a lot of hope that our bumper blackberry crop will be a successgiven how much of our plot is taken over by brambles, we're going to be swamped for the next 6 monthsbut until then, it's all about the redcurrants, blackcurrants and gooseberries. 

I was browsing Pinterest the other day, trying to find recipes that use redcurrants. I had no idea what to use them in. I soon came across this recipe for redcurrant gin, however. I say recipe, but it's barely even thatit's basically just gin, redcurrants and sugar, and the method couldn't be simpler. I've seen other recipes that add lemon zest, so I decided to split my mixture in half and try half with zest, half without.


Homemade redcurrant gin in a Kilner jar


I'm not sure what to expect from this, and I've got no idea what mixer to serve it with. I saw someone on a forum suggesting ginger beer and I quite like the sound of this, so might try it out when the gin is ready in a couple of months! I used this Kilner Square Clip Top Jar 0.5 Litre from Amazon. I know there are lots of preserving jars out there, but I always use Kilner as I love the look and feel of them, and they always seem so solidly made! I've got these jars in a variety of sizes, and I used two 0.5 litre ones for this gin. I added lemon zest to one and not the other so I can compare the two once they're ready and see which I prefer.

Redcurrant Gin Recipe

Ingredients

300g redcurrants
150g caster sugar
750ml gin
zest of one lemon (optional)

Method

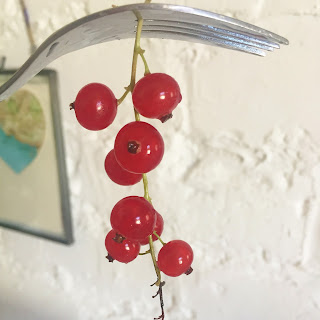
1. Remove the redcurrants from their stalks by holding the top of the bunch firmly in one hand and running a fork lightly down the strig. Wash thoroughly.

2. Crush the redcurrants with the caster sugar, and lemon zest if using (I used a fork to lightly crush the berries), in a bowl. 

3. Transfer to a Kilner or similar airtight jar, add the gin, and seal the jar. 

4. Place the jar in a cool, dark place, and shake it once a day for one month, then just occasionally for another month.

5. After the two months are up, strain the gin through a sieve of muslin cloth and decant into a bottle. 

I'll let you know the results in approximately two months!

How to remove redcurrants from their stalks

Redcurrants in a bowl

Redcurrant gin in a Kilner jar

Follow my blog with Bloglovin

Monday 10 July 2017

Redcurrant overload

So, although our neighbour has now collected all the huge, juicy redcurrants from his plot, ours haven't ripened quite as quickly as his. We've collected some of the best ones - to be used for redcurrant gin very shortly! - but there are still a lot that aren't fully ripe. 

The bushes are heavily laden and very, very dense, but as our plot has been neglected for so long, they presumably haven't been pruned in a while. After watching this short but helpful Gardeners' World clip of Monty Don  pruning redcurrants I can see what needs doing before next summer.

For this year, however, we'll hopefully get some decent redcurrants, although it seems there's just far too much fruit on the bushes for them to get as large and juicy as they should be.

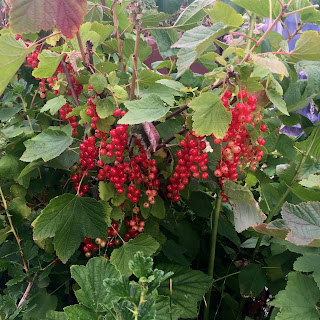
Redcurrants on an overgrown and neglected bush
Neglected redcurrant bush

Redcurrants ripening on an overgrown bush
Ripening redcurrants - pretty inconsistent in places!

(Almost) spring on the allotment

I'd be enjoying this run of warm, sunny weather much more if it was, say, early May than February, but it's certainly been nice to g...