01 09 10
Showing posts with label weed membrane. Show all posts

Tuesday, 4 September 2018

Cheap, simple allotment paths

We finally got round to starting to lay some paths last week, and it makes arriving at the plot so much more pleasant! After much uhming and aahing, we decided to go for wood/bark chip paths on the allotment. We have such a terrible problem with marestail that we needed paths that consisted of several layers to try and stop anything getting through. Our heavy-duty weed membrane has proven to be no match for the ever-tough marestail, and the nasty green spears were popping up all over the covered parts of our plot all summer and spring.

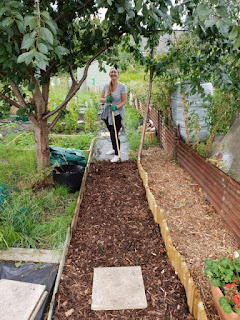
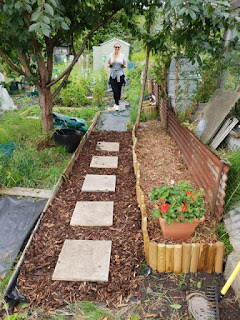
We certainly didn't want to spend too much cash putting down allotment paths, so tried to keep it cheap and simple. The photos below show the beginnings of the main path down the side of the plot last week. We've done a fair bit more since these pictures but forgot to take photos at the weekend. 

First, we cleared as many of the weeds as possible. Some parts of the plot have been covered with thick weed membrane since last summer, and we've been pulling up the marestail as it pokes through wherever possible, so some of the path areas weren't too bad. Next, we laid down a couple of layers of thick cardboard, hoping this would provide another barrier against the weeds. It will also rot down over time into the soil. On top of the cardboard we added heavy-duty weed membrane, which we pegged down on either side at intervals of about one metre. Next, we heaped on mounds of wood chippings and bark chippings. We got a lot of chippings free as the council had recently delivered a truckload to the allotment. We also bought some very cheap chippings from Asda, Home Bargains and Wilko, and will continue to snap up any we see on offer in the end of season sales! We'll obviously need a huge amount to cover all our planned allotment paths, but we're not in any huge rush so will continue to grab the free council chippings whenever they're delivered.

New allotment path with weed membrane down

Finally, we have started laying paving slabs on top of the chippings. We've got a fair few slabs scattered around the plot and thought we'd try them out for this purpose. 

spreading woodchippings on allotment path


We've had very limited time down at the plot this summer as we both work full-time and this year has been horribly stressful due to family illnesses, bereavements and a number of other things that have taken up all our weekends and energy. It's so nice to see small signs of progress on the allotment though, and we're excited to get some more paths finished over the autumn!

woodchipping and pacing stone allotment path

I'm looking forward to seeing how the paths fare against the marestail next spring - fingers crossed it can keep the stuff under control!

Tuesday, 1 August 2017

Building a Shed Base on an Allotment

Building Our Allotment Shed Base

When we took on our plot, it was incredibly overgrown (still is), with the worst offenders being brambles, mare's tail, bindweed and couch grass. The area in which we wanted to place our shed was originally completely overtaken by brambles, reaching around 12-feet high in places. We decided we'd keep an area of brambles against the back fence of the allotment, and bring the shed forward a little from where we would have ideally placed it.

We looked at various options for the shed base and decided for budget, time and lack-of-DIY-skills reasons to go for a plastic shed base. These are really convenient as they can be placed on grass or bare ground. We bought our 8 x 6 shed base off eBay for around £70, including delivery. It was supplied with a heavy-duty weed membrane to be used underneath the plastic grid base.

Preparing the ground for our shed base


To prepare the ground where we wanted the shed, we had to cut back a lot of very tall and very dense brambles, as well as remove what seemed like miles of bindweed and a lot of 6-feet tall mare's tail! We cut everything back as much as we could, then dug up all the bramble roots (hard work!).

Post cutting back, pre-digging!

 We then set about digging over the ground, partly to bury any of the less troublesome weeds a couple of feet under the ground, and also to help with levelling out the very uneven and bumpy ground. There was a difference in up to a foot between the ground level in places! The ground was also extremely rocky, with lots of broken glass and pottery, so we pulled out anything we found as we dug. 

After some heavy-duty digging and clearing

When we'd got the ground fairly level, we took our plastic shed base sections and laid them on the ground with a spirit level to see how level the ground really was. Pretty level, thankfully! We smoothed out any noticeably uneven sections, then set about laying out the heavy-duty weed membrane supplied with our shed base. We've been using heavy-duty membrane to cover the areas of the plot we've been clearing in order to weaken the mare's tail etc. before we get round to cultivating the land, but this stuff was something else! While nothing has come through the membrane we've been using, the sheet supplied with the base is a fair bit thicker so I'd consider trying to find this to purchase if I needed permanent ground cover anywhere on the plot in future.

Assembling the shed base


Unpacking the plastic shed base

Once the membrane was in place, we set out the shed base sections. Next came the only frustrating part of the process - attaching the clips! The base was supplied with lots of little plastic clips that fasten each section to the adjacent section, and also anchor the base to the ground. Attaching the clips to the grid sections was OK, but making pilot holes in the membrane through which to stick the anchoring part of the clip was not. The only way to do this was the make holes around the clips - I'm sure jabbing the weed fabric with a pair of scissors while cursing the manufacturers is not how most people do this, but we couldn't think of another way. 

Laying a plastic shed base on weed membrane
Laying out the plastic shed base

We also got caught in a huge thunder/rain/hail storm halfway through laying the base, so I was effectively stabbing into the wet mud with a pair of scissors. Not enjoyable.

Eventually, we managed to get the base laid out and had all the clips anchored through the membrane and into the (by now sodden) ground. We left it all to dry out a little overnight and returned the next morning.

Filling the base with gravel


How to fill a shed base with gravel
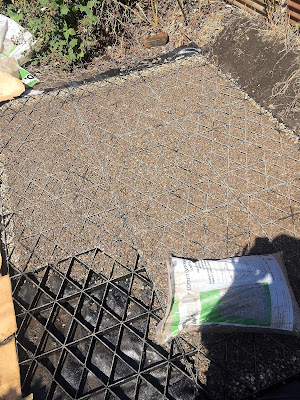
Filling the plastic shed base with gravel

Far more satisfying than constructing the base was the emptying of 12 sacks of gravel into the plastic grids and smoothing it out with our feet. I'm not sure why, but this was quite enjoyable and we really got a feel for how solid and strong the base would be once it was finished. We used B & Q 10mm gravel. I'd totally recommend it. It is actually quite attractive, very reasonably priced and would make a good path covering too so we might actually buy some more for this purpose. It's currently £3.18 for a sack, or £2.20 when you buy 10 or more, which we did. 

B&Q 10mm gravel


Finally, we had our sturdy, level base!

Plastic shed base filled with gravel on allotment
Completed allotment shed base
All in all, we're really happy with our allotment shed base. I'd definitely use this method again in future if budget/time was an issue, but would probably do away with the clips supplied with the base and explore other options. While we did manage to get them into the ground, this was a complete pain to do and I'm sure there is a far better method than the one we used!


Friday, 7 July 2017

Weed Suppressant

As our plot was so overgrown when we took it on, we decided to start by clearing the worst of the weeds and then laying down some kind of weed suppressant. We researched a few different options and spoke to other plotholders and friends who were experienced gardeners. While a lot of people seemed to favour old carpet in the past, this wasn't an option as the use of carpet is banned on our allotment. The reason for this is that chemicals can seep into the soil. We didn't have ready access to carpet anyway, so this wasn't too much os a disappointment! Cardboard was another option, and we still intend to lay down some very heavy cardboard in some parts of our plot, possibly the more heavily overgrown sections that we won't get to just yet.

We also considered black plastic sheeting. There was already some of this on our plot, albeit very ripped and cracked. While this is a popular option as it keeps light AND water off the ground, thereby killing weeds more quickly, we were put off by the fact that the ground would be very dry and hard to work. We always planned to uncover small sections of ground at a time, and map out and dig over our beds one by one.

As the vast majority of the central part of our plot was taken over by mare's tail, which we'd be breaking off at the ground, and various grasses, we opted for weed membrane, which we hoped would be able to cope with finishing off the grass while preventing the mare's tail from popping up again. We read lots of reviews online and checked out forums to find which one would suit our needs. We knew we'd be traipsing back and forth over it, and that it needed to be heavy duty. We also wanted something that would let water in but was thick enough to effectively block light.

We checked out a few fabrics in shops, but lots of them seemed pretty flimsy and let a lot of light through.

 Eventually, we decided on this Yuzet Heavy Duty Weed Control Fabric from Amazon. It gets great reviews, and seemed reasonably priced for a heavy duty weed membrane. It also came in 50m rolls, which was great as we knew we'd need a lot! While it's only really been a couple of months since we laid the first of our weed control fabric, we're really impressed so far. It's withstood all kinds of weather so far, and has remained firmly in place. There are absolutely no signs of wear and tear yet, except at the odd edge where we've snagged it while cutting, or have had to pull pegs out to move them.

Weed control fabric on Allotment 22


As you can see from the photo, it's got a bit of a sheen to it, and is a little more plasticky than lots of fabrics. I was concerned it might tear easily because of the texture, but this honestly hasn't been a problem. The guidelines down the length of the fabric will be helpful when we come to lay paths in future and the fabric is really easy to cut with regular scissors.

We started off holding it down with bricks, but this wasn't ideal as they're easy to trip over and kick out of position. We got these Yuzet 6" Weed Control Fabric Pegs, also from Amazon, and they've been great to use. We push them in as far as we can with our hands, then stand on them firmly to push them right into the ground. It's a lot easier when it's rained recently, that's for sure! The only problems we've had are when the pegs have hit stone or pebbles - all too common on our plot, sadly - and we have to pull them out to re-position them. When you do this, the hooks on the pegs can catch on the weed control fabric and fray it a little but it's not too much of an inconvenience.

All in all, we're impressed with this product so far and will certainly be buying it again when we run out of our current supplies.

(Almost) spring on the allotment

I'd be enjoying this run of warm, sunny weather much more if it was, say, early May than February, but it's certainly been nice to g...