01 09 10
Showing posts with label fruit. Show all posts

Thursday, 13 July 2017

Redcurrant Gin Recipe

Easy redcurrant gin recipe


I love gin. It's the only spirit I actually drink, and I love how versatile it is. My favourite way to drink it at the moment is with elderflower tonic (which I've only just discovered!), a few slices of cucumber and a couple of fresh mint leaves. Hopefully I'll be growing cucumber and mint on the allotment by next year, and I'd quite like an elderberry bush eventually too, but for the moment, all we've got is lots of berries in various stages of ripeness and attractiveness.

I'm holding out a lot of hope that our bumper blackberry crop will be a successgiven how much of our plot is taken over by brambles, we're going to be swamped for the next 6 monthsbut until then, it's all about the redcurrants, blackcurrants and gooseberries. 

I was browsing Pinterest the other day, trying to find recipes that use redcurrants. I had no idea what to use them in. I soon came across this recipe for redcurrant gin, however. I say recipe, but it's barely even thatit's basically just gin, redcurrants and sugar, and the method couldn't be simpler. I've seen other recipes that add lemon zest, so I decided to split my mixture in half and try half with zest, half without.


Homemade redcurrant gin in a Kilner jar


I'm not sure what to expect from this, and I've got no idea what mixer to serve it with. I saw someone on a forum suggesting ginger beer and I quite like the sound of this, so might try it out when the gin is ready in a couple of months! I used this Kilner Square Clip Top Jar 0.5 Litre from Amazon. I know there are lots of preserving jars out there, but I always use Kilner as I love the look and feel of them, and they always seem so solidly made! I've got these jars in a variety of sizes, and I used two 0.5 litre ones for this gin. I added lemon zest to one and not the other so I can compare the two once they're ready and see which I prefer.

Redcurrant Gin Recipe

Ingredients

300g redcurrants
150g caster sugar
750ml gin
zest of one lemon (optional)

Method

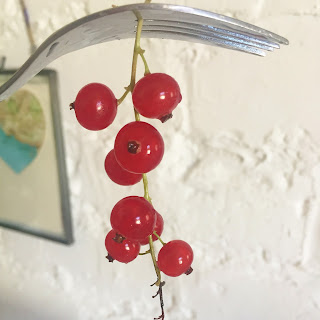
1. Remove the redcurrants from their stalks by holding the top of the bunch firmly in one hand and running a fork lightly down the strig. Wash thoroughly.

2. Crush the redcurrants with the caster sugar, and lemon zest if using (I used a fork to lightly crush the berries), in a bowl. 

3. Transfer to a Kilner or similar airtight jar, add the gin, and seal the jar. 

4. Place the jar in a cool, dark place, and shake it once a day for one month, then just occasionally for another month.

5. After the two months are up, strain the gin through a sieve of muslin cloth and decant into a bottle. 

I'll let you know the results in approximately two months!

How to remove redcurrants from their stalks

Redcurrants in a bowl

Redcurrant gin in a Kilner jar

Follow my blog with Bloglovin

Monday, 10 July 2017

Redcurrant overload

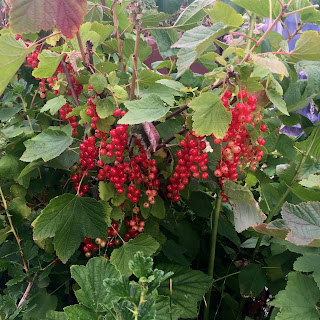
So, although our neighbour has now collected all the huge, juicy redcurrants from his plot, ours haven't ripened quite as quickly as his. We've collected some of the best ones - to be used for redcurrant gin very shortly! - but there are still a lot that aren't fully ripe. 

The bushes are heavily laden and very, very dense, but as our plot has been neglected for so long, they presumably haven't been pruned in a while. After watching this short but helpful Gardeners' World clip of Monty Don  pruning redcurrants I can see what needs doing before next summer.

For this year, however, we'll hopefully get some decent redcurrants, although it seems there's just far too much fruit on the bushes for them to get as large and juicy as they should be.

Redcurrants on an overgrown and neglected bush
Neglected redcurrant bush

Redcurrants ripening on an overgrown bush
Ripening redcurrants - pretty inconsistent in places!

Thursday, 6 July 2017

Strawberry Cupcakes

I've been making these cupcakes for years and they're perfect for summer - light, fluffy, fruity and colourful. The cake is a simple vanilla sponge, while the buttercream is flavoured with fresh strawberries. The beautiful strawberries used were donated by a more established plot holder (obviously he gets some cakes as a thank you), but I can't wait to be picking my own strawberries from Allotment 22 next summer!


Recipe (makes 12)

Cupcakes

250g caster sugar
250g self-raising flour
250g butter (at room temperature)
2 medium free range eggs
2 tbsp milk
1 tsp vanilla extract
Pinch of salt

Straweberry buttercream

150g butter
375g icing sugar
150g strawberries 
Extra strawberries to garnish

1. Pre-heat oven to 190°C/Gas Mark 5. 

2. Beat the butter in a large mixing bowl until smooth. Add the sugar, flour, eggs, milk, vanilla and pinch of salt and whisk until the mixture is well combined and smooth. 
3. Place the cake cases into a muffin tin and divide the mixture evenly between the cases.
4. Bake for approximately 20 minutes, or until cakes are a light golden brown colour.  Remove cakes from the tin and transfer to a wire rack to cool.

For the frosting:

1. Puree the strawberries. If you want a smooth buttercream, push the pureed strawberries through a sieve to remove the seeds.
2. Beat the butter in a large bowl until soft and smooth. Add the puree, then incorporate the icing sugar gradually, beating until you have reached the desired consistency.
3. Pipe or spread your buttercream onto the cakes, finishing each one with a fresh strawberry.

These cakes are best kept in the fridge until shortly before serving.

Monday, 3 July 2017

Discovering our Pear Tree


When we first viewed our plot, the fruit trees were in full blossom. The largest tree we knew was a cherry tree, likewise the smaller tree next to it. I recognised one of the other trees as being an apple tree, but had no idea about the others. We recently learned that we have a pear tree - great news for me as I absolutely love pears! It didn't seem to be in great condition, however, so I took a closer look to see what state it was in.

When I say I'm a complete beginner to allotmenteering/gardening, it's not an exaggeration! Apart from a few containers in our small yard at home, and a few houseplants that have managed to survive beyond a couple of weeks, I've never done any growing or cultivation.

The first thing I noticed was that some of the leaves of the pear tree had red spots on them. These had occurred in clusters of leaves, with large sections of the tree unaffected. A quick Google search revealed this was pear leaf blister mite, which, obviously, I'd never heard of. I learnt that you can simply remove the affected leaves if the infestation isn't too severe, but that you should leave them alone if the entire tree is covered as removing that many leaves is likely to cause severe damage to the tree. As it wasn't particularly widespread, we simply began to remove the affected clusters of leaves.
IMG_4769

While it doesn't look very appealing, pear blister mite does not affect the fruit, so it's still safe to eat. The Royal Horticultural Society has more in-depth information on the pear blister mite here.

The next thing I discovered was pear scab. This was only present on a couple of pears, and again, isn't serious. I honestly had no idea of all the crop-specific conditions and diseases that were out there, but luckily everything I've come across so far has been non-serious and easy to deal with! While pear (and apple) scab is serious in commercial crops as it means the fruit can't be sold, it apparently barely affects the quality of the fruit at all so the fruit can still be used. I'm not sure how tempting I would find scabby fruit, even knowing it was safe, but it doesn't seem to be very widespread at all so fingers crossed it stays that way!

IMG_4770

The RHS (again - what would I do without their site and books?) recommends pruning young shoots that have been affected, and clearing away fallen leaves and affected fruit to try and limit the amount of fungus still around to cause scabbing next season.

Next job is to closely inspect the apple tree and see what kind of state that's in!

No. 22: Positives so far!

While it's easy to be disheartened by the amount of work we've got to do, we have come across some positives so far!

Cherry tree


We've been told by other plotholders that our cherry tree is way too big and should have been kept to a height of around 10 feet ideally. I've no idea how tall it currently is...20 feet maybe? It's hard to tell. When we first viewed the plot it was in full blossom and looked so pretty that it definitely helped sell the plot to us. It went on to drop a lot of cherries before they were ripe and it hasn't been possible to cover it this year to protect the cherries from birds as it's so huge so I'm not sure we'll get much from it this season. We plan to cut it back considerably when we can and give it a little TLC.

cherry tree in full blossom (April)

Redcurrants, raspberries and gooseberries


When we viewed the plot, we were told we had a few raspberry bushes at the entrance. Turns out it's not just raspberries.

redcurrants starting to ripen (June)

The bushes were/are absolutely swamped by weeds and mare's tail (of course!) but we're working on clearing them. There was an awful lot of bindweed strangling the fruit bushes but we've made good progress with this. We've got a few decent berries from the bushes, and the goosberries have probably fared best of all this year. Perhaps they're simply more able to stand up to neglect and pests than redcurrants and raspberries? Hopefully by next summer we will manage to get a decent harvest from this part of the allotment!

Apple and pear trees


We originally thought we had two apple trees, but it soon transpired one was in fact a pear tree. Neither tree looked in particularly great condition. and we soon discovered the pear tree had pear leaf blister mite. This turned out to be fairly easily dealt with, despite it not looking very attractive. We're looking forward to seeing how the apples and pears turn out this summer!

apples growing (June)

Brambles


Of course, we also have lots and lots of brambles, reaching around 8 feet high in some places. Possibly a lot more than 8 feet - it's hard to tell! We're going to collect as many blackberries as possible once they're ripe, and then plan to drastically cut back the brambles in the winter. We will probably keep a small area of brambles as they're predominantly right at the back of our plot in a shaded area next to a fence and trees. We're planning to place our compost bin next to that area, and want to leave a small part of our plot relatively untouched for wildlife. We have a lot of frogs on our plot and they seem to be concentrated around that damp, shaded area. Also - blackberries. Who doesn't love blackberry and apple crumble?


(Almost) spring on the allotment

I'd be enjoying this run of warm, sunny weather much more if it was, say, early May than February, but it's certainly been nice to g...