Building Our Allotment Shed Base
When we took on our plot, it was incredibly overgrown (still is), with the worst offenders being brambles, mare's tail, bindweed and couch grass. The area in which we wanted to place our shed was originally completely overtaken by brambles, reaching around 12-feet high in places. We decided we'd keep an area of brambles against the back fence of the allotment, and bring the shed forward a little from where we would have ideally placed it.
We looked at various options for the shed base and decided for budget, time and lack-of-DIY-skills reasons to go for a plastic shed base. These are really convenient as they can be placed on grass or bare ground. We bought our 8 x 6 shed base off eBay for around £70, including delivery. It was supplied with a heavy-duty weed membrane to be used underneath the plastic grid base.
Preparing the ground for our shed base
To prepare the ground where we wanted the shed, we had to cut back a lot of very tall and very dense brambles, as well as remove what seemed like miles of bindweed and a lot of 6-feet tall mare's tail! We cut everything back as much as we could, then dug up all the bramble roots (hard work!).
 |
| Post cutting back, pre-digging! |
We then set about digging over the ground, partly to bury any of the less troublesome weeds a couple of feet under the ground, and also to help with levelling out the very uneven and bumpy ground. There was a difference in up to a foot between the ground level in places! The ground was also extremely rocky, with lots of broken glass and pottery, so we pulled out anything we found as we dug.
When we'd got the ground fairly level, we took our plastic shed base sections and laid them on the ground with a spirit level to see how level the ground really was. Pretty level, thankfully! We smoothed out any noticeably uneven sections, then set about laying out the heavy-duty weed membrane supplied with our shed base. We've been using heavy-duty membrane to cover the areas of the plot we've been clearing in order to weaken the mare's tail etc. before we get round to cultivating the land, but this stuff was something else! While nothing has come through the membrane we've been using, the sheet supplied with the base is a fair bit thicker so I'd consider trying to find this to purchase if I needed permanent ground cover anywhere on the plot in future.
Once the membrane was in place, we set out the shed base sections. Next came the only frustrating part of the process - attaching the clips! The base was supplied with lots of little plastic clips that fasten each section to the adjacent section, and also anchor the base to the ground. Attaching the clips to the grid sections was OK, but making pilot holes in the membrane through which to stick the anchoring part of the clip was not. The only way to do this was the make holes around the clips - I'm sure jabbing the weed fabric with a pair of scissors while cursing the manufacturers is not how most people do this, but we couldn't think of another way.
We also got caught in a huge thunder/rain/hail storm halfway through laying the base, so I was effectively stabbing into the wet mud with a pair of scissors. Not enjoyable.
Eventually, we managed to get the base laid out and had all the clips anchored through the membrane and into the (by now sodden) ground. We left it all to dry out a little overnight and returned the next morning.
Filling the base with gravel
 |
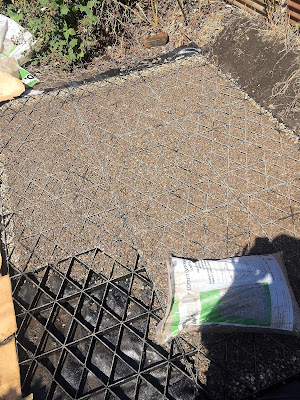
| Filling the plastic shed base with gravel |
Far more satisfying than constructing the base was the emptying of 12 sacks of gravel into the plastic grids and smoothing it out with our feet. I'm not sure why, but this was quite enjoyable and we really got a feel for how solid and strong the base would be once it was finished. We used B & Q 10mm gravel. I'd totally recommend it. It is actually quite attractive, very reasonably priced and would make a good path covering too so we might actually buy some more for this purpose. It's currently £3.18 for a sack, or £2.20 when you buy 10 or more, which we did.
 |
| B&Q 10mm gravel |
Finally, we had our sturdy, level base!
 |
| Completed allotment shed base |


